Sending with Gmail
No mail server of your own? A Gmail account can send Tesria’s email. It suits a small team: a handful of password resets, invitations and notifications a day.
Gmail will not let a program like Tesria use your everyday password. There are two other ways, and you can switch between them at any time:
An app password: a separate, 16-letter password that works only for the program you give it to. About five minutes, and the quickest start. If it ever leaks, you delete it and nothing else is affected.
Sign in with Google: you sign in once, on Google’s own page, and Tesria never holds a password at all. It needs a small Google Cloud project, about fifteen minutes the first time, and it keeps working when the Gmail password changes, which ends every app password.
Use an account made for the wiki. A new Gmail address such as ourteam.wiki@gmail.com keeps the wiki’s email out of your own inbox and sent folder, and means nobody’s personal account is tied to it. The emails people receive come from this address.
Before you start
A Gmail account you can sign in to.
For an app password: 2-Step Verification turned on for that account. Google only offers app passwords when it is. If it is off, turn it on at
myaccount.google.com/security, under How you sign in to Google.
A work or school Google account (Google Workspace) may not offer app passwords, because the organization’s administrator decides. Sign in with Google works there, or ask the administrator.
The quick way: an app password
Step 1: Make an app password
Go to
myaccount.google.com/apppasswordsand sign in to the Gmail account the wiki will send from.Type a name you will recognize later, such as
Tesria, and choose Create.Google shows the password once, as four groups of four letters. Copy it now; you cannot see it again. If you lose it, delete it and make another.
Step 2: Fill in Tesria’s email settings
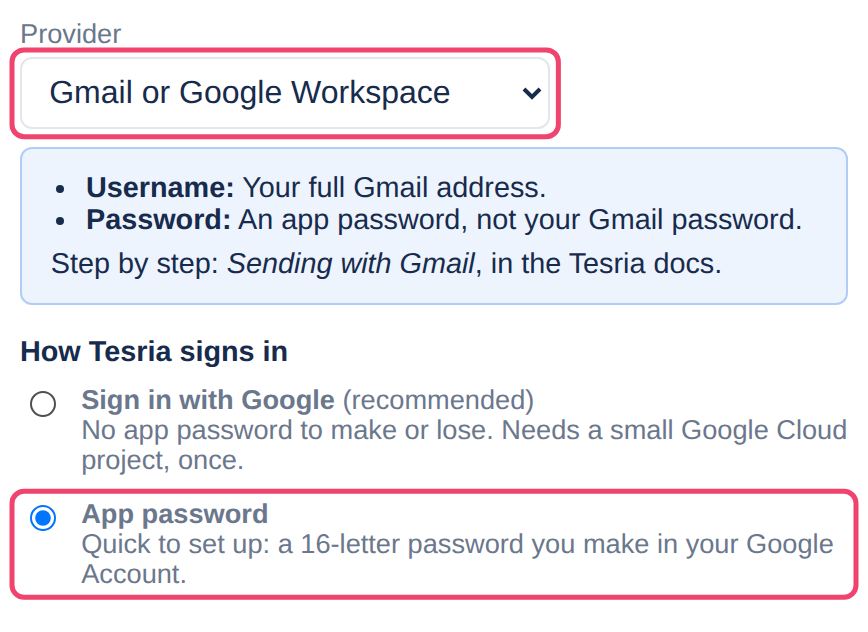
Choose Admin, then Settings. In the Email section, choose your provider under Provider: that fills in the server for you. Then fill in the rest:
Setting | Value |
|---|---|
Provider | Gmail or Google Workspace |
SMTP host |
|
Port |
|
Encryption | STARTTLS |
Username | The full Gmail address |
Password | The app password, without the spaces |
From address | The same Gmail address |
Under How Tesria signs in, choose App password. Then choose Save mail settings.
Step 3: Turn it on and send a test
Turn on Send email at the top of the section, then choose Send test email to me. The test goes to the email address on your own Tesria account. Check that it arrived, including in the spam folder.
The lasting way: sign in with Google
Here you make a small “app” of your own in Google Cloud, tell Google that Tesria is allowed to come back to it, and then sign in once. It is your own because every Tesria has its own address, and Google only sends a sign-in back to addresses the app has registered. It costs nothing.
Step 1: Create a Google Cloud project
Go to
console.cloud.google.comand sign in. Any Google account you will keep works; it does not have to be the one that sends.Open the project list at the top, choose New project, name it
Tesria, and choose Create.
Step 2: Describe the app to Google
With the new project selected, open Google Auth Platform (search for it at the top) and choose Get started.
Give the app a name, such as
Tesria, and a support email address (your own).For who may use it, choose External. A Google Workspace organization can choose Internal instead, and then only its own accounts can sign in, with no warning screens.
Add a contact email and finish.
Step 3: Publish it, so the sign-in lasts
Under Audience, choose Publish app and confirm, so its status reads In production. This matters: an External app left in Testing has its sign-ins ended by Google after seven days, and email would stop a week later. (An Internal app has no such status; skip this step.)
No review from Google is needed. Google reviews apps that the public signs in to. One that only you use, such as a mail plugin for your own site, is exempt; Google shows you a warning instead, once, in step 6.
Step 4: Create the client
Under Clients, choose Create client.
For the application type, choose Web application and name it
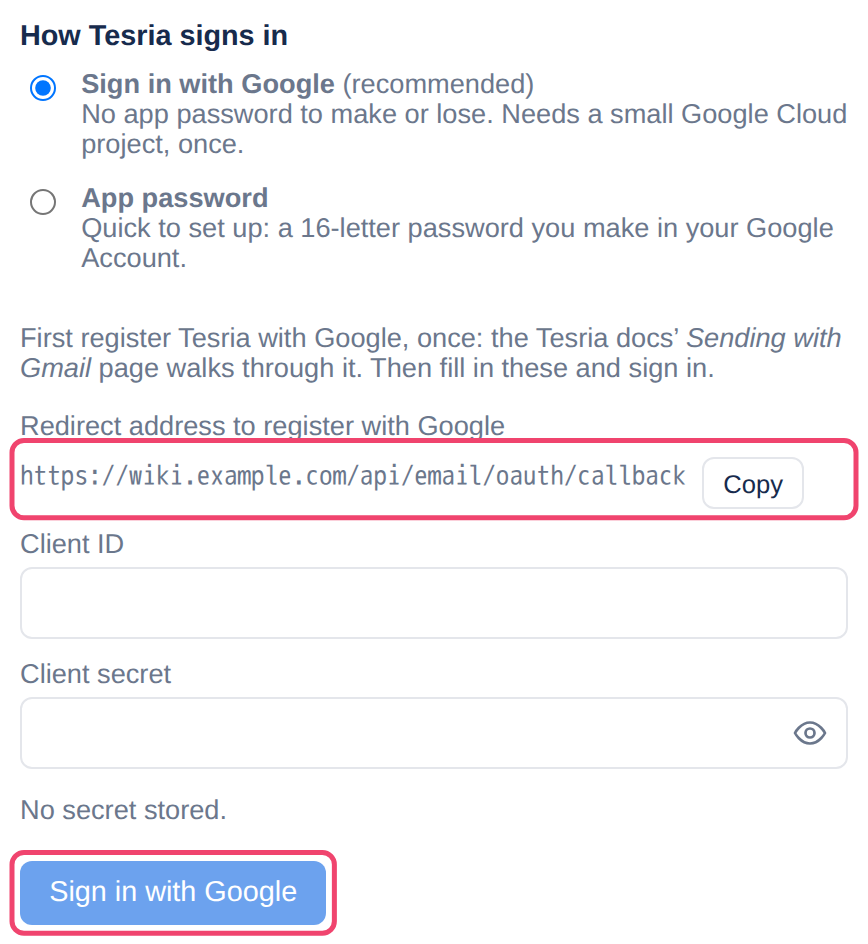
Tesria.Under Authorized redirect URIs, choose Add URI and paste the address Tesria shows in its email settings, under Redirect address to register with Google (step 5 shows where).
Choose Create, then copy the Client ID and the Client secret.
Tesria on a local name, such as wiki.local or 192.168.1.50? Google only returns to addresses on public domains, so Tesria’s settings say to choose Desktop app as the type instead. That needs no redirect address; step 7 is the extra step it takes.
Step 5: Sign in from Tesria
In Admin, Settings, Email, choose Gmail or Google Workspace under Provider and leave Sign in with Google chosen. Paste the client ID and secret, then choose Sign in with Google.
Step 6: Allow it on Google’s page
Choose the Gmail account the wiki will send from.
Google says Google hasn’t verified this app. That is expected: the app is the one you made a few minutes ago. Choose Advanced, then Go to Tesria.
Google asks to let the app read, compose, send and delete your email. That is how Google describes the only permission that allows sending from another program, which is one more reason to use an account made for the wiki. Tesria only sends. Choose Continue or Allow.
Google returns you to Tesria, which says Signed in. Email now goes out from and the address. Tesria has filled in the server, the username and the From address itself.
Step 7: Only on a local name: paste the address back
With a Desktop app client, Google cannot return to Tesria, so after you allow it your browser opens a page that does not load, at an address starting with http://127.0.0.1. That is expected. Copy the whole address from the address bar, go back to Tesria’s tab, paste it into Paste the address of the page that did not load, and choose Finish signing in.
Step 8: Send a test
Turn on Send email at the top of the section if it is off, choose Send test email to me, and check that the message arrived, including in the spam folder.
If the test fails
“Username and Password not accepted” with an app password means Gmail refused it. Check that the username is the whole address, and paste the app password again. Your everyday Gmail password does not work here.
The email arrives from a different address than the From address. Gmail sends only as the account that signs in, so use that address.
An app password worked, then stopped. Changing the Gmail account’s password deletes all of its app passwords. Make a new one and enter it in the Password box.
A signed-in Tesria stopped sending after a week. The app was still in Testing (step 3). Publish it, then choose Sign in again with Google.
Administrators get the alert Email stopped: the mail sign-in was refused. Google ended the sign-in, for example because someone removed Tesria’s access in the Google account. The email settings show Google’s reason; choose Sign in again with Google.
Good to know
Gmail limits how much one account sends in a day. A small team never reaches it. If your wiki has hundreds of people who all want email notifications, use one of the Sending services instead.
You can switch off either way at any time. Delete the app password, or remove Tesria under your Google account’s third-party connections. Tesria stops sending until you set it up again.
Applies to | Tesria 0.5 and later |
|---|---|
Updated | September 24, 2026 |
Changes | Revised. |