Invites
An invite is a link that lets one person create an account. It is how you add people when anyone-can-join is off, which is what most teams want for a wiki that can be reached from the internet. The link stops working once it has been used.
To open it, choose Admin, Invites (Admin is in the top bar; in a narrower window it is under More, and on a phone in the ☰ menu).
If your Tesria sends email, it can email the invite for you, with a note in your own words, so there is nothing to copy and paste into a chat. Without email, you copy the link and send it however you like. See Email (SMTP) to set email up.
Creating an invite
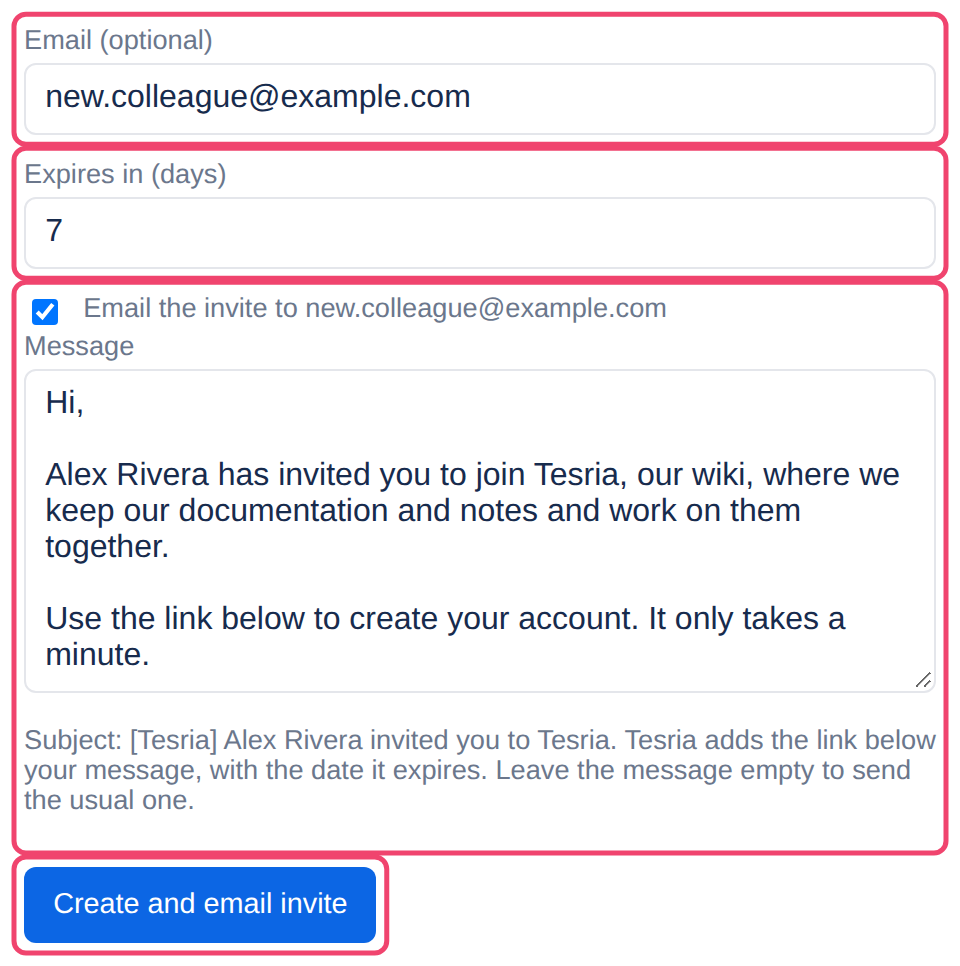
Step 1: Enter their email address, if you know it
With an address, only someone registering with that address can use the link, so a forwarded link is no use to anyone else. Leave it empty for a link that works for whoever has it. Tesria refuses an address that already has an account.
Step 2: Choose how long it lasts
From 1 to 90 days; 7 unless you change it.
Step 3: Write a note, if Tesria is emailing it
Once you type an address, and your Tesria sends email, Email the invite to appears, already ticked, with a Message box. The message starts as a short, friendly note saying who invited them and to what. Change it to anything you like: a welcome, what the wiki is for, where to start reading.
You do not need to add the link. Tesria puts it below your message, with the address it works for and the date it expires, so it cannot be left out or mistyped. Leave the message empty to send the usual one. The subject line names you and your Tesria, so the email is easy to recognize.
Why a note helps. An email from a wiki someone has never heard of looks like spam. A line such as “This is where we keep the onboarding checklist, start with the Welcome page” tells them it is real and what to do first.
Untick it to make the invite without emailing it, for example to send the link in a chat instead.
Step 4: Create the invite
Choose Create and email invite (or Create invite without the email). The link appears once, above the list, whichever you chose. If it was emailed, a green note says so. Otherwise choose Copy and send it yourself. If you lose it, revoke the invite and make a new one.
If the email could not be sent, the invite is still made, and a red note gives the mail server’s reason. Copy the link and send it another way, then see Email (SMTP) to find out why.
The copied link starts with the address you are using. Make invites from Tesria opened at the address everyone uses, not at localhost on the server, or the link will not work for the person you send it to. An emailed link uses the address set in Settings instead.
With Tailscale, there are two links. If your Tesria is also on a tailnet (see Reaching Tesria from anywhere with Tailscale), the invite shows At this address and Through Tailscale, each with its own Copy. They are the same invite, so it still works once: send whichever address the person can reach. An emailed invite carries both.
Keeping track
The list below the form shows every invite: who it is for (or Anyone), whether it is Unused, used and by whom, or expired, and when it expires. Revoke cancels an unused one after asking; whoever you sent it to will need a new one.
Letting others invite
The right to Create invite links can be given to a user role on the Roles tab, for example so team leads can bring in their own people. They get Invite people in their top bar, with the same form but without the list: they cannot see or revoke anyone else’s invites.
Applies to | Tesria 0.5 and later |
|---|---|
Updated | September 24, 2026 |
Changes | 0.6: with Tailscale, a second link for people on your tailnet. |